Saturday, 31 October 2015

Animation Test 001 - 4 days Workflow

The 1st Animation Test was for another company, a dialogue shot, which was not really done well because of my inexperience. I will post that one up when i have the time. So the one here is actually the 2nd Animation Test for me. For this one, its a Body Mechanics shot (which i really love!), with a fixed Set given and general guidelines on what to animate, while i can use any Rig or additional Props and there is no limit on the shot's length.

So without revealing too much on the details of the test (it may be confidential), this post will focus on the workflow process.

I was given 3 days to do a Splined shot and 1 day to do Polish.


Day 1 (8 hrs):

Since Planning is one of the most important, or The Most important for some, i gave 1 out of 3 days to do this. After reading the requirements, the best part of planning came. Watching lots and lots of videos from Youtube. Thought about the Theme while watching, and slowly streamlined the videos i watched.

Downloaded all the videos that may be used for reference later. Went through them again for more inspiration to generate ideas.

The Theme i chose was Parkour style.


After soaking the mind with tons of actions and ideas, i sat myself down on a cosy chair and started imagining the shot. And watched more videos when necessary. Somewhere in there i decided to use a sword.


Drew some Thumbnails of the rough idea of the shot.


Took my own Reference videos for the actions that were missing from the previously gathered videos.
*Sorry about the messy house*


Using Grease Pencil in Maya i quickly Blocked out the actions to get the feel and rough timing of the shot with the set prepared.


Now i can download any Props or Rigs needed for the shot or customise the Rig if really neccessary. In this case i used Jules Rig from Animation Mentor, and a free sword Rig that Carles Vallbona from FB recommended. The sword Rig was done by Carlos Contreras


Day 2 (9hrs):

Its Blocking time! Using the Reference videos and the Planning i did the 1st Blocking in Stepped Tangent. Added in breakdowns where neccessary especially on spins. Adjusted the timing. At the same time tried out different camera angles or movement. 


Due to time constrain, i shortened a part from the beginning. I took out the kicking of the sword into the air spinning before grabbing it to throw. Thinking about it now, it may actually be a good idea, if not there will be too much sword spinning. Also took out the run before the jump onto the wall.


Day 3 (11hrs):

Added in anticipations, overshoots, eases, holds, and more breakdowns for Blocking Plus. Adjusted the timing again. Splined it in Auto Tangent, and done final tweak to movements like kick-off or grip. 


Day 4 (12hrs):

Last day for Polish, based on some feedback from the company after submitting what's done by day 3. The critique, which included adding back the run, was brutal, but it made the shot alot better. Also added in the stuff that i did not have time to complete before, like the landing on the ground and the sword wobbling on contact. Since there is a run, i also created some camera movement.


Overall it was a great experience. What i would improve is the Planning or more Thumbnails, so that my Blocking can be faster. With the time saved i could have done hair movement, add more facial expressions and some squash and stretch to the limbs, have another Overlapping Action pass and Path of Action pass.


Saturday, 24 October 2015

Maya tips 008 - Euler Filter

Sometimes in the middle of the splined animation the arm or legs just go haywire, rotating massively around before getting to the next key pose. Usually this occurs when there is a lot of action, having to key a wide range of poses.

So do a check on the Graph Editor.


I realised the graphs seems very extreme from one another. And if i manually adjust the curves, all my keys and poses will be off. And if i leave it alone, i may have to correct those weird frames by editing every frame. The Euler Filter will helps solve this problem. It can be found under Curves menu in Graph Editor.


Basically what it does is it shifts all keys highlighted to the closest value to 0, still maintaining the exact position in space. Its like magic! All poses are exactly the same, but the graph looks normal now! This is how much it has moved looking at buffer curves.


And the result is this.


Sometimes it may just be a few keys that go extreme. Just highlight the whole curve and click Euler Filter!

Lesson learnt 006 - Walk vs Run cycle

We all know walk cycle is. What about a run cycle? Is animating a run cycle the same way as a walk cycle but just different pose? Well i tried doing just that and it took so much more time to tweak it to look like a run. The problem here is the additional air time with both feet off the ground in run a cycle.

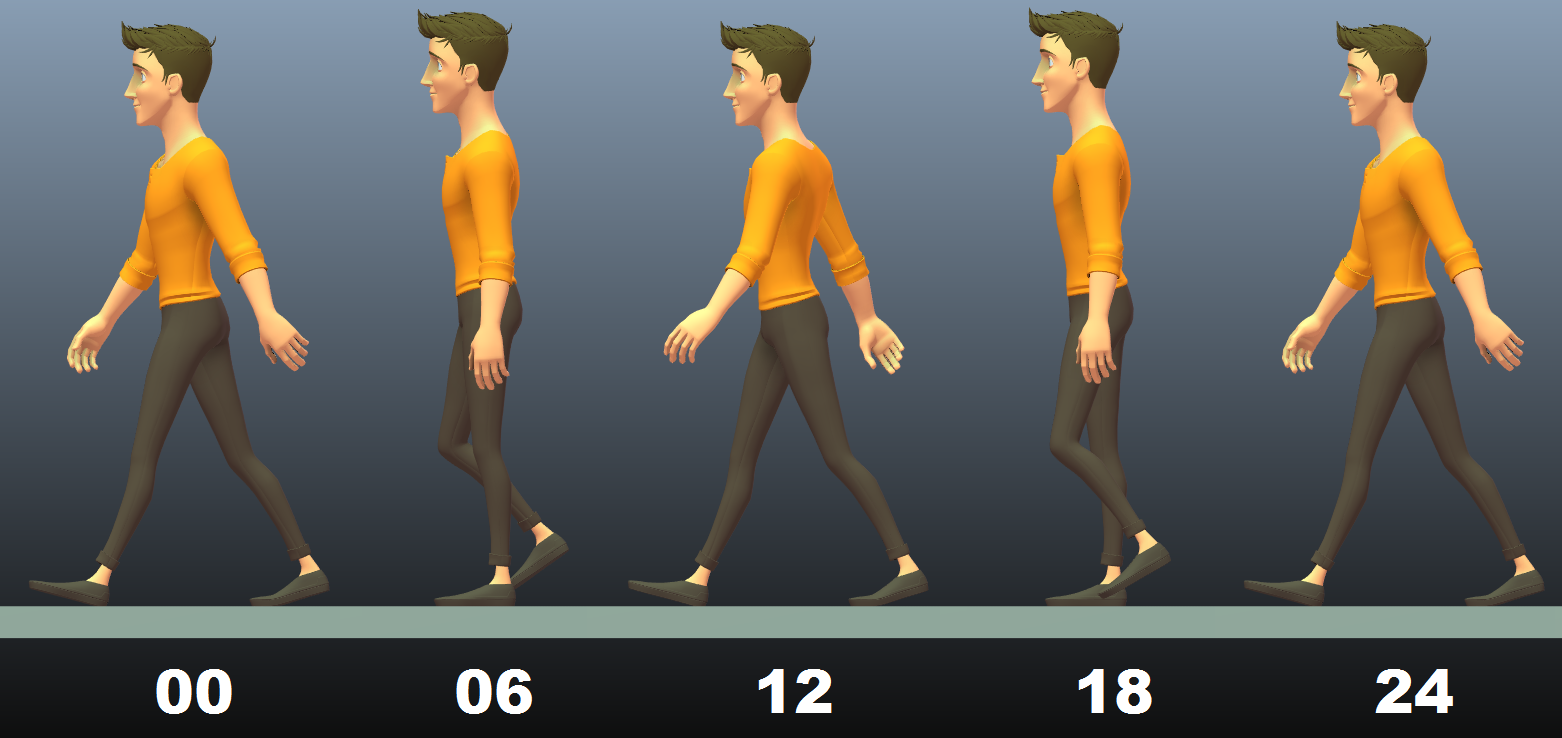
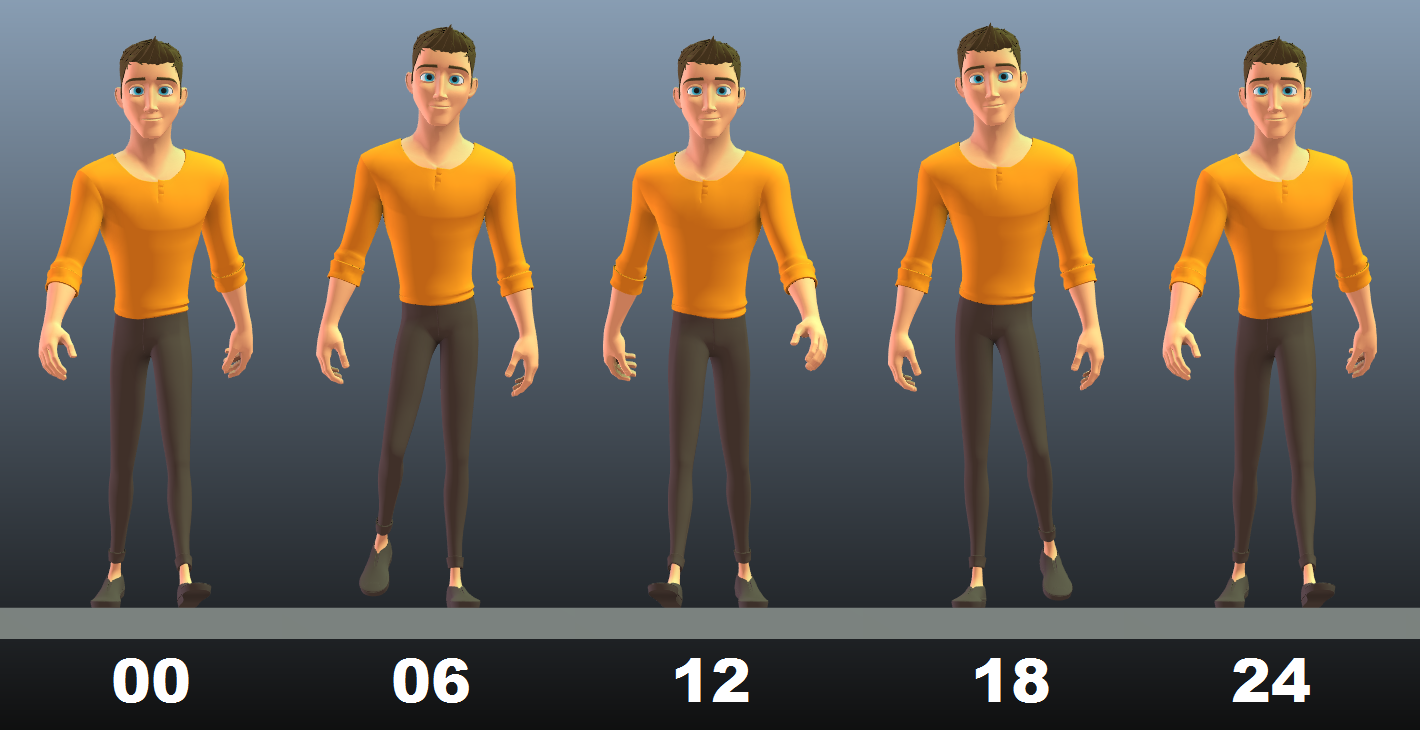
So this is a faster and easier way to start a walk and run cycle before going into polishing the foot and offset some of the timing.

Lets look at walk cycle 1st.
12 frames per step, 24 frames a cycle, Auto Tangents.
5 key frames, 5 poses.
Contact (2 feet), crossover (1 feet), contact (2 feet), crossover (1 feet), contact (2 feet).


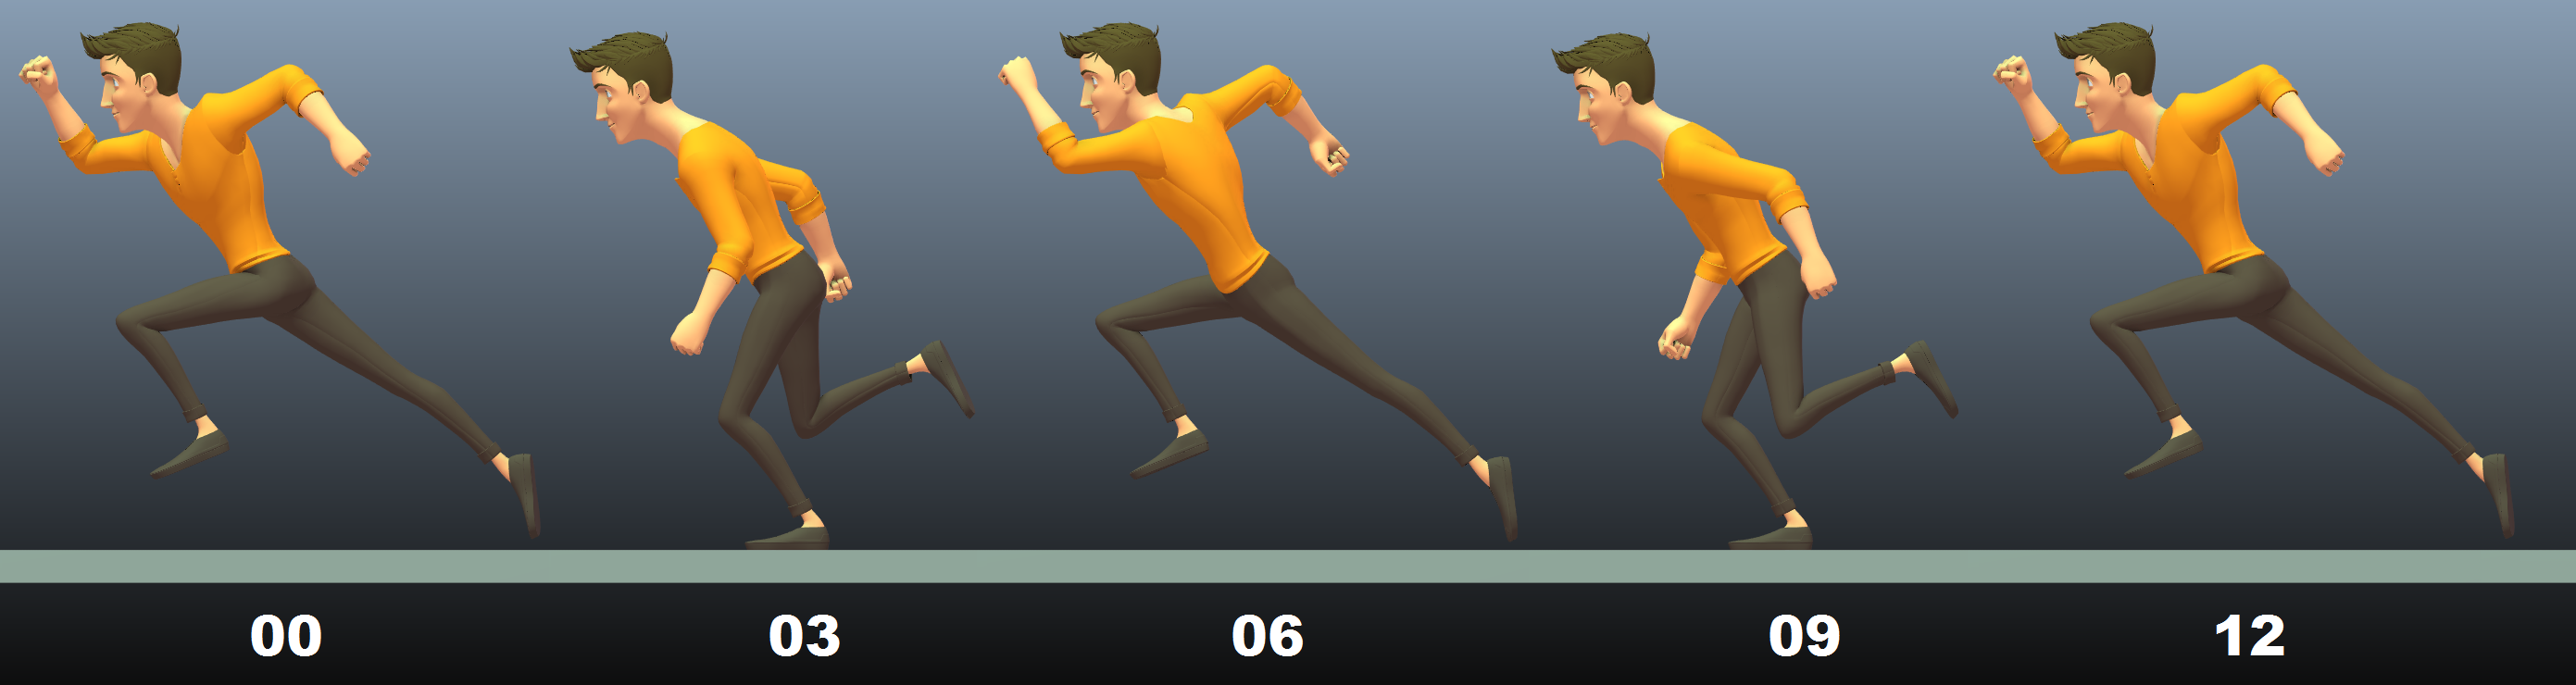
Run cycle is a little different. I can't remember where i've seen this but i tried it and it works!
6 frames per step, 12 frames a cycle, Auto Tangents.
5 key frames, 5 poses.
Push-off (2 feet), crossover (1 feet), push-off (2 feet), crossover (1 feet), push-off (2 feet).


Note: Crossover pose must be exactly like this, with the front feet fully flat, rear feet at its highest TY. Push-off pose, front knee is at highest TY, rear leg is fully extent, rear feet slightly off the ground with toes straightened.


With just these 5 poses and auto tangent, the run almost looks complete. And there is a bonus air time created when splined.

Saturday, 30 May 2015

Saturday, 9 May 2015

Lesson learnt 005 - Customizing Bishop Rig with Extras

Easier way to customise Bishop Rig with what's available in Animation Mentor's AMP and AM shelf. Or i should say easier then customising Aia Rig.

So here it is:

1. Double click Bishop file in AMP to open, or click "Open in Maya..."


2. Import Extras into Maya.


3. Click Extras button in AM shelf.


4. Follow steps from 2 onwards.


5. Save the file on Desktop, name it, and drag it into the AMP Assignment folder.


Now it can be referenced into the shot for animation.

That's it!!


Saturday, 28 March 2015

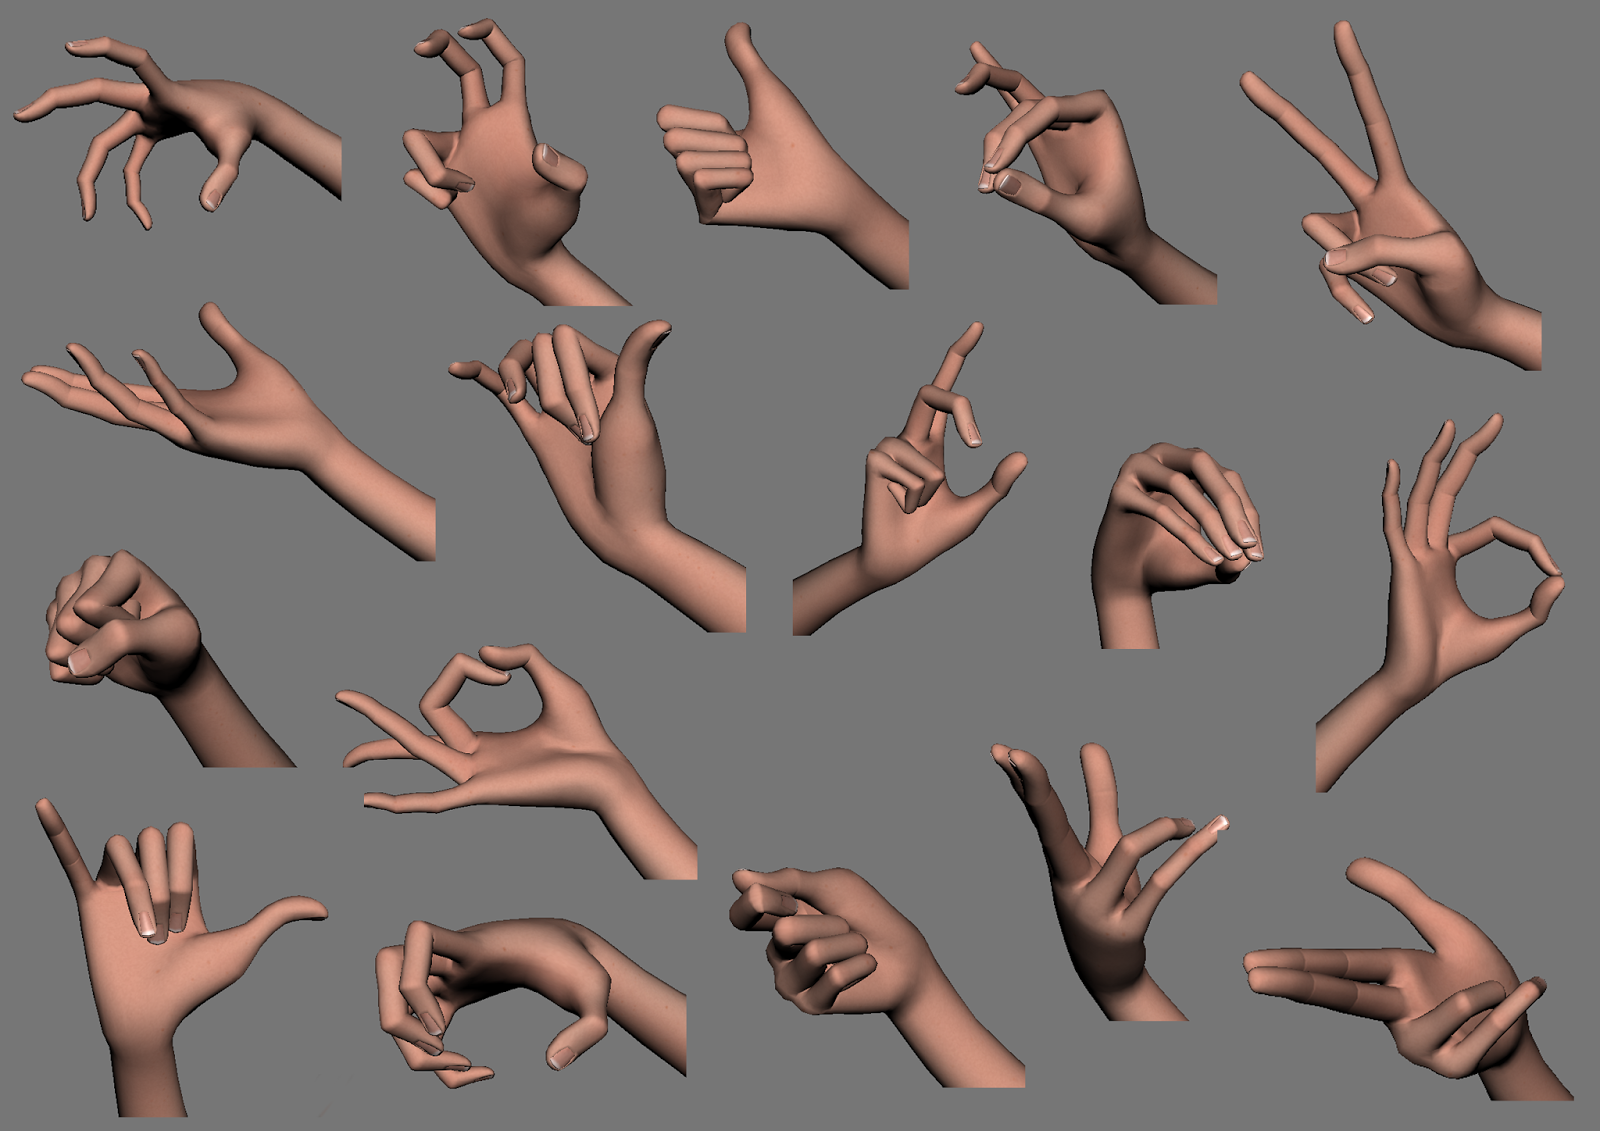
Hand poses practice

After watching an Animation Mentor lecture on the importance of Hand animation i decided to do some practice with Hand Poses.

It is very important that the hands have an appealing look or pose. It tells a story all by itself. So after taking some reference hand photos and using Aia's hand to do the pose, this is the result.


Take note a lot of time spent after posing, is actually getting a good camera angle on the pose. Some angle just don't look good and some does. And depend on the rig used, Aia's fingers are really long and thin, so it is really a challenge. I can't fully copy my hand pose, i have to tweak the position of the fingers a little to look good.

Saturday, 14 March 2015

Lesson learnt 004 - Vanilla walk cycle

This is a simple walk cycle or vanilla walk cycle assignment from Animation Mentor.

The Vanilla Walk

A typical Vanilla walk or a relaxed walk will have a speed of 24 frames per cycle.


Concept

So, what makes a walk possible? What is a walk?

A walk is a series of controlled falls. When a body's Centre of Gravity (CG) is tilted by leaning forward, it should fall forward. While the body falls, a feet moves forward and contacts the ground, which balance the weight shift or CG. But not totally balanced (if not the walk will stop), still leaving some CG tilt, the body continues moving forward and the next feet takes over the balance. Therefore one importance note is that the body continuously tilts forward throughout the walk. The diagram below illustrates from left to right.
But of course if it is a Characteristic walk then the concept will be different. Below is an example where the legs are the driver of the CG forward instead of the body.

Breakdown

The Concept above is a basic description of a walk. For more detailed and complete analysis, lets get into the breakdowns.

Each cycle of 24 frames starts from one foot forward, transit to the other leg and back again. So each 12 frames is actually a symmetry of the other leg cycle. In this 12 frames there is a the ground Contact of one foot forward and one foot backwards, follow by a Passing of the rear foot to the front and then another ground Contact of that foot. It is further break down into in-betweens namely Extreme High and Extreme Low. Take note on the Extreme Low, the legs bend so the body actually dips in height a little. While at Extreme High, the leg is straightened and the toes are tipped and so the body raises.
This is just the beginning, as if it is not complicated enough..

If the character that is animated has both legs starting from one same point then this animation would sufficient. But if the legs starts from 2 different points, as in a hip, then there is more to go.

Weight Shift

When the body is supported by both legs, in Contact pose, the weight is distributed equally to both sides, so the hips is flat. 

During the transition to the Passing pose, where one leg is lifted up, all the weight is now shifted to the other leg and to the hips. So to balance and not fall side ways, the hips shifts sideways, bringing the CG back to the centre (may not need to be totally back to centre because soon the other leg will contact), as well as tilt up one side because of weight acting on it.


More Hips Rotation

Other then the hips raising and dropping from the side by RZ to take the weight, there are 2 more rotation axis. 1st is RY axis, where turning the hips will result in opening the legs less to get a bigger stride, saving energy. 2nd is the RX, where every time the body drops and raises in height at Extreme poses, it will also drag forward and backwards


Notice most of the above happens because locomotion in a human body is very efficient, and those movement actually saves a lot of energy.

Finish Up

Lastly its Splining and adding more in-betweens to create the kick-off for the rear feet. And also adding in some drag for the toes. 

The most tricky part is finding out when to start tipping the toes and also when to lift foot from ground. Studying reference videos will greatly help!

Below is Ghosting for the curves to track the motion.