Showing posts with label lessons. Show all posts

Tuesday, 1 December 2015

Lesson Learnt 007 - Walk cycle methods

I was giving a lot of feedback, for class 1 students in Animation Mentor, on animating Vanilla Walks. Got inspired i had to do a practice on this. When do we actually attempt past assignments again right.

While animating i realised 2 things.
1. I it took way more time then i thought it will take me.
2. There are new mistakes that i encounter.

This are the stages in animating the Vanilla Walk using the Monsterball Rig from Animation Mentor.


There are basically 2 methods to animate a walk.
1. Animate the walk forward in respect to a stationary ground, leaving the Root Control untouched.
2. Animate the walk on the spot, as if walking on a treadmill, after which translate Root Control forward to create a walk on normal ground.

Both methods have its advantages and disadvantages.
1. Easier to animate together with other sequence or actions. Don't have to worry about the Root controller. Difficult to copy the exact displacement to the last frame to create a cycle.
2. Usually used in games where a cycle of a action is needed. Easier to create cycle because the exact displacements can be easily copied over. Need to ensure the displacement is the same as the displacement of Root Control to prevent sliding on the ground.

In this practice i used method 1. The mistake became apparent when i translated the Root Control. So the mistake is, while animating on the spot, the rear kick off was also done on the spot instead of constantly moving backwards. It can be clearly seen below.


It may not be visible playing in real time. But when the Root Control was translated the kick off foot slides forward.

Make sure in graph editor the curve looks like the image below. The foot kick off is from f12 - f15.


Instead of the image below, where the translation is almost none.


Make sure the Root Control translation curve looks like this.


And the feet will not slide anymore.


Saturday, 24 October 2015

Lesson learnt 006 - Walk vs Run cycle

We all know walk cycle is. What about a run cycle? Is animating a run cycle the same way as a walk cycle but just different pose? Well i tried doing just that and it took so much more time to tweak it to look like a run. The problem here is the additional air time with both feet off the ground in run a cycle.

So this is a faster and easier way to start a walk and run cycle before going into polishing the foot and offset some of the timing.

Lets look at walk cycle 1st.
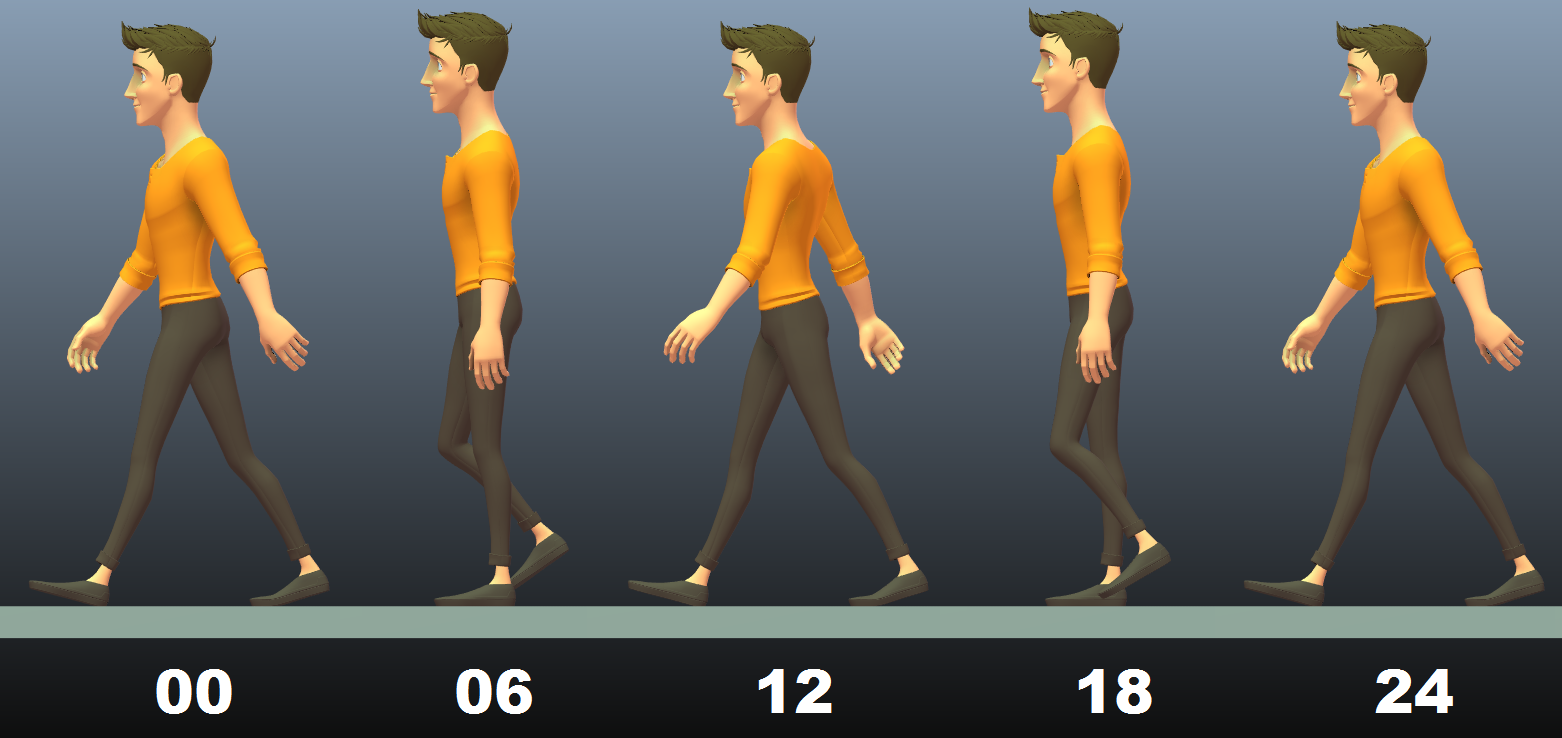
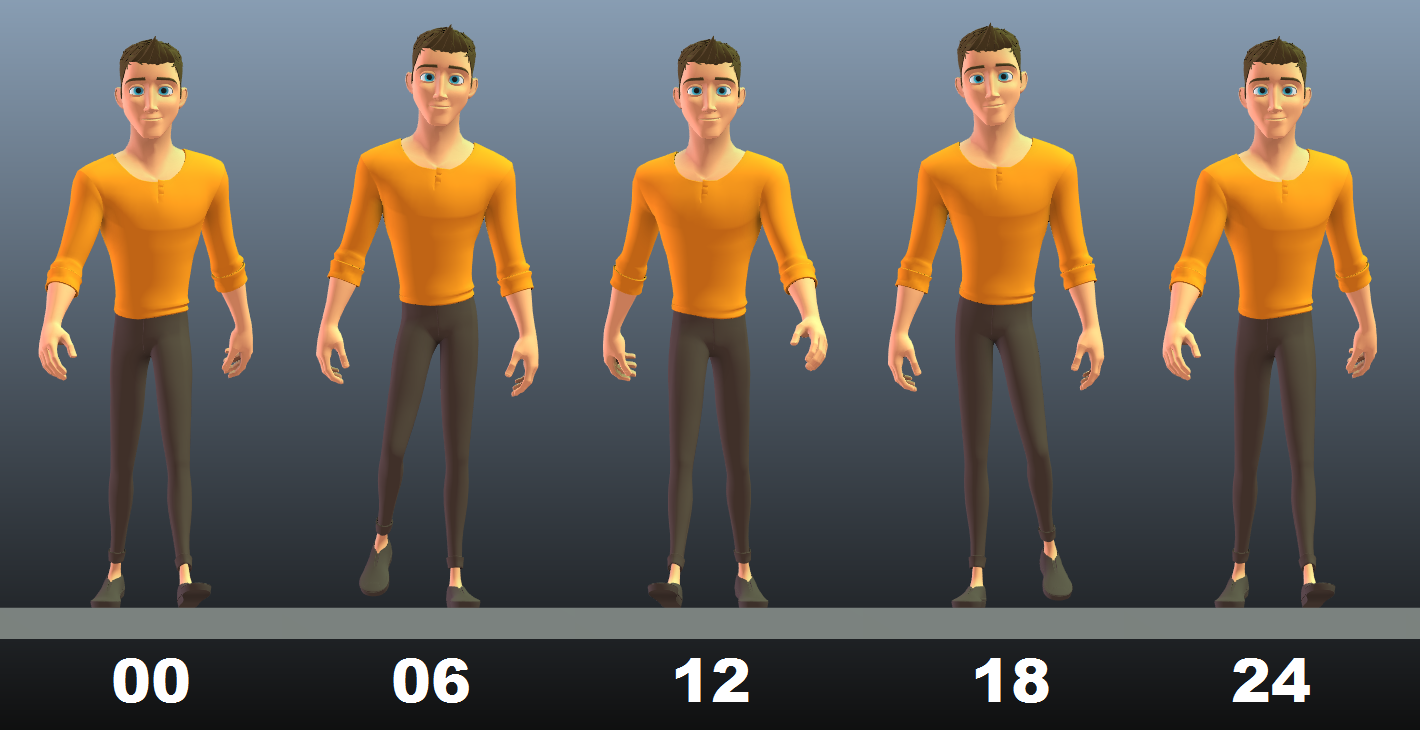
12 frames per step, 24 frames a cycle, Auto Tangents.
5 key frames, 5 poses.
Contact (2 feet), crossover (1 feet), contact (2 feet), crossover (1 feet), contact (2 feet).


Run cycle is a little different. I can't remember where i've seen this but i tried it and it works!
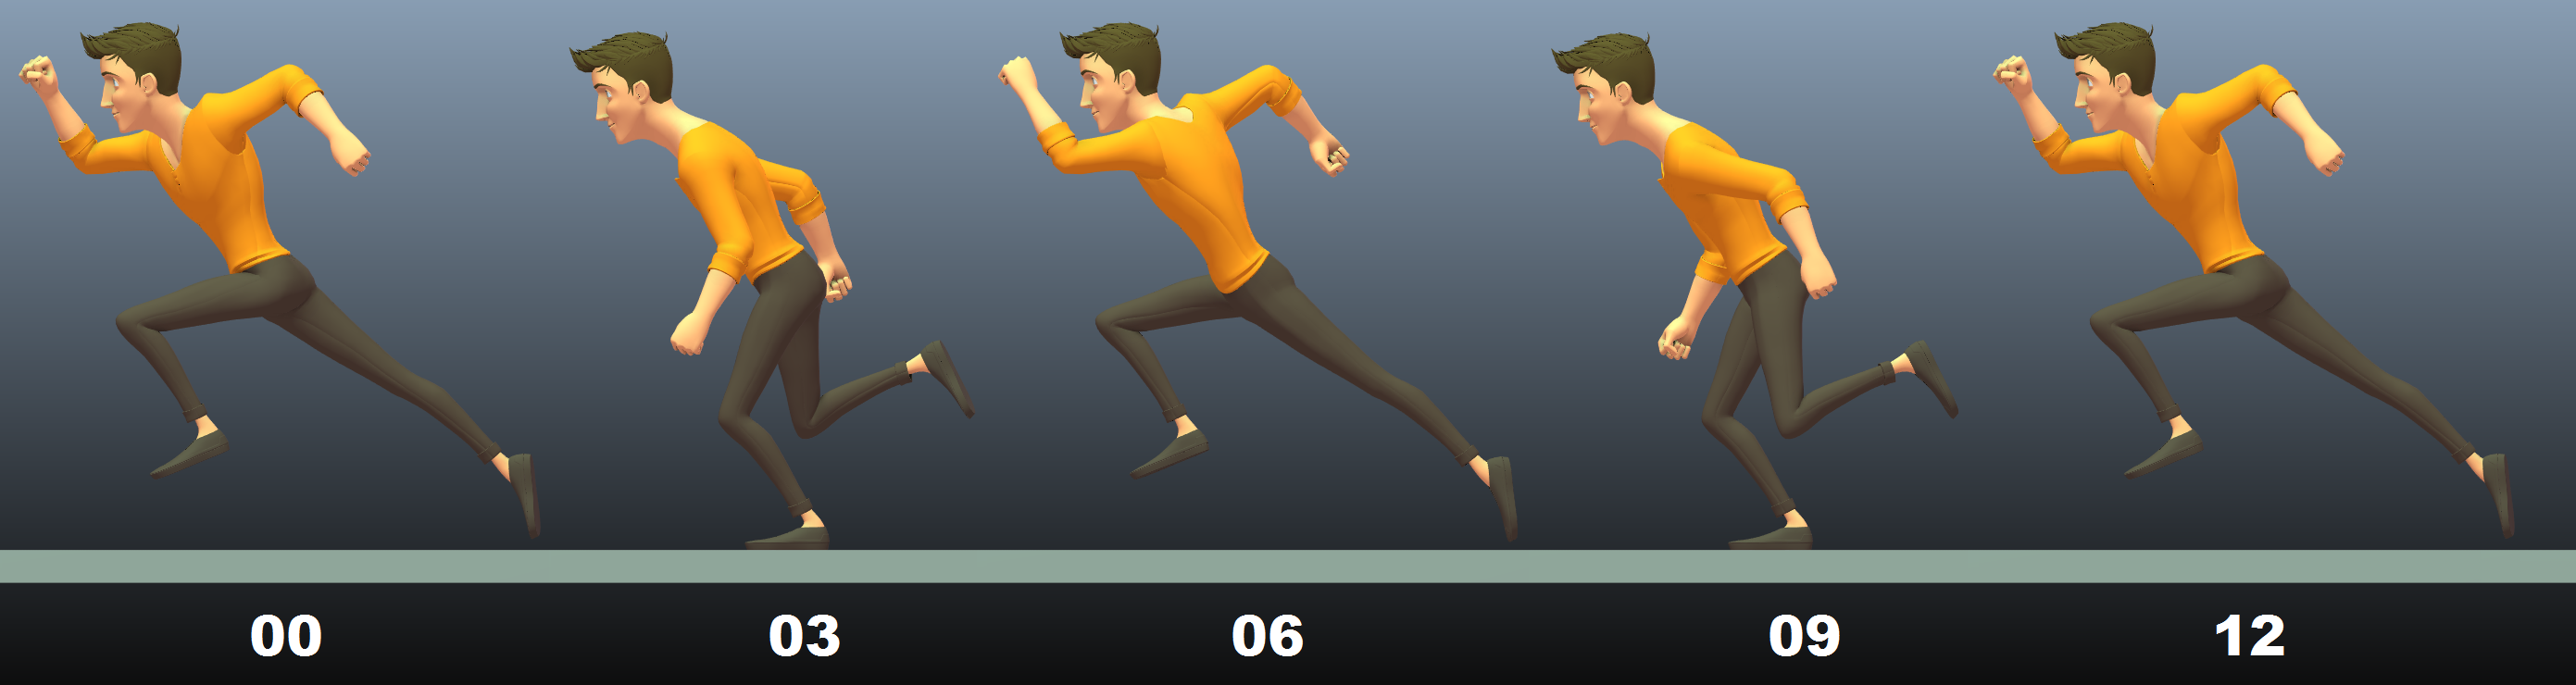
6 frames per step, 12 frames a cycle, Auto Tangents.
5 key frames, 5 poses.
Push-off (2 feet), crossover (1 feet), push-off (2 feet), crossover (1 feet), push-off (2 feet).


Note: Crossover pose must be exactly like this, with the front feet fully flat, rear feet at its highest TY. Push-off pose, front knee is at highest TY, rear leg is fully extent, rear feet slightly off the ground with toes straightened.


With just these 5 poses and auto tangent, the run almost looks complete. And there is a bonus air time created when splined.

Saturday, 9 May 2015

Lesson learnt 005 - Customizing Bishop Rig with Extras

Easier way to customise Bishop Rig with what's available in Animation Mentor's AMP and AM shelf. Or i should say easier then customising Aia Rig.

So here it is:

1. Double click Bishop file in AMP to open, or click "Open in Maya..."


2. Import Extras into Maya.


3. Click Extras button in AM shelf.


4. Follow steps from 2 onwards.


5. Save the file on Desktop, name it, and drag it into the AMP Assignment folder.


Now it can be referenced into the shot for animation.

That's it!!


Saturday, 14 March 2015

Lesson learnt 004 - Vanilla walk cycle

This is a simple walk cycle or vanilla walk cycle assignment from Animation Mentor.

The Vanilla Walk

A typical Vanilla walk or a relaxed walk will have a speed of 24 frames per cycle.


Concept

So, what makes a walk possible? What is a walk?

A walk is a series of controlled falls. When a body's Centre of Gravity (CG) is tilted by leaning forward, it should fall forward. While the body falls, a feet moves forward and contacts the ground, which balance the weight shift or CG. But not totally balanced (if not the walk will stop), still leaving some CG tilt, the body continues moving forward and the next feet takes over the balance. Therefore one importance note is that the body continuously tilts forward throughout the walk. The diagram below illustrates from left to right.
But of course if it is a Characteristic walk then the concept will be different. Below is an example where the legs are the driver of the CG forward instead of the body.

Breakdown

The Concept above is a basic description of a walk. For more detailed and complete analysis, lets get into the breakdowns.

Each cycle of 24 frames starts from one foot forward, transit to the other leg and back again. So each 12 frames is actually a symmetry of the other leg cycle. In this 12 frames there is a the ground Contact of one foot forward and one foot backwards, follow by a Passing of the rear foot to the front and then another ground Contact of that foot. It is further break down into in-betweens namely Extreme High and Extreme Low. Take note on the Extreme Low, the legs bend so the body actually dips in height a little. While at Extreme High, the leg is straightened and the toes are tipped and so the body raises.
This is just the beginning, as if it is not complicated enough..

If the character that is animated has both legs starting from one same point then this animation would sufficient. But if the legs starts from 2 different points, as in a hip, then there is more to go.

Weight Shift

When the body is supported by both legs, in Contact pose, the weight is distributed equally to both sides, so the hips is flat. 

During the transition to the Passing pose, where one leg is lifted up, all the weight is now shifted to the other leg and to the hips. So to balance and not fall side ways, the hips shifts sideways, bringing the CG back to the centre (may not need to be totally back to centre because soon the other leg will contact), as well as tilt up one side because of weight acting on it.


More Hips Rotation

Other then the hips raising and dropping from the side by RZ to take the weight, there are 2 more rotation axis. 1st is RY axis, where turning the hips will result in opening the legs less to get a bigger stride, saving energy. 2nd is the RX, where every time the body drops and raises in height at Extreme poses, it will also drag forward and backwards


Notice most of the above happens because locomotion in a human body is very efficient, and those movement actually saves a lot of energy.

Finish Up

Lastly its Splining and adding more in-betweens to create the kick-off for the rear feet. And also adding in some drag for the toes. 

The most tricky part is finding out when to start tipping the toes and also when to lift foot from ground. Studying reference videos will greatly help!

Below is Ghosting for the curves to track the motion.


Monday, 2 February 2015

Lesson learnt 003 - Ball bounce concept

Lets go back to the very 1st animation assignment from Animation Mentor. 

The Bouncing Ball.

Yes it seems really basic, and simple. But it is nothing close to that. In order to make it look real requires deep understanding. And everyone starts with this practice.

The Bouncing Ball is a start to learning what it requires to be able to animate realistically. It teaches me to study reference videos closely and understand the physics behind it before even planning the shot. It teaches me the concept of Timing and Spacing in animation. It teaches me squash and stretch motion which is applies to any other rig. It teaches me the importance of path of action. It lets me use the graph editor to see what the translation curve looks like and edit it correctly. 

Concept

So this is what i understand from my research. May vary slightly from other people.

First the physics part -

According to Galileo, two bodies of different masses, dropped from the same height, will touch the floor at the same time in the absence of air resistance. And that is because the force acting on any object is the same, being gravity. From experiments done in a vacuum tube, where there is zero air resistance, a feather drops as fast as a coin. But in a normal environment, the feather gets so much air resistance it just stops accelerating so much sooner then the coin. Which means if 2 balls of the same shape and size but with different weight, drops from the same height, would contact the ground at the same time. Because both has the same air resistance.

So then why do they still seems so different after they are dropped? Because they bounce and roll different. And the thing that caused that difference is Inertial. The more the weight, the harder it is to move it or stop it, vice versa. Therefore the height reduction of a heavy ball, after it bounces off the ground, will be a lot more then a light ball. Most of the energy is used up to propel the ball in an opposite direction. Resulting in lower and lesser bounce. Likewise for distance travelled during the bounces or how far it will roll. And it is due to friction too. More force is needed to push the heavy ball against the friction on the ground, resulting in shorter distance.

An example of 2 balls with different weight :


An example of 1 bouncing ball :


This is a graph for Y-Axis translation :


This is the most tricky curve where timing and spacing is very important here. Timing is where the number of frames for each arc gets reduced after each contact. Spacing is how much the apex is curved so that the motion is slowed down near apex for hang-time, and on contact the curve is a V shaped so that the motion is fastest here. Each bounce height will reduce about the same amount, 40% in this case, throughout till it reaches those tiny bounces where the height reduction is minimal.

This is a graph for Z-Axis translation :


Because the ball hasn't come to a stop at frame 83, the curve is still somewhat steep. After changing direction then the curve gradual and comes to a stop.

This is a graph for X-Axis rotation :


Make sure when the ball starts rolling, it matches the ground contact.

This is the graphs together :


Depending on the ball materials. Assuming the ball is hard material and the ground is hard. There will be many tiny bounces at the end. Similarly a light ball will have many tiny bounces, whereas a heavy ball will have very few.

Take note to correctly curve in the right direction especially when it hits a wall and bounce back.

If the ball were to bounce off the wall in mid-air, the bounce height off the wall will still be lower then the previous bounce. There is just not enough energy to go any higher. The path of action will like something like this:


For squash and stretch, i did a test and found 3 possible variation. Slight different but its personal preference.


This is its graph:


Green curve is Y-Axis translation, Grey curve is Squash and Stretch.

The slight difference in 1st and 2nd jump is at the apex, where the one is neutral and the other has a little squash. 3rd jump differs with the extended stretch till almost the apex before it returns to neutral. 

Just realised i can add in some ease in and ease out for the squash and stretch to improve this shot.


Friday, 16 January 2015

Lesson learnt 002 - Customizing Rig with extras.

This is the 1st time i use the Aia Rig from Animation Mentor. And also the 1st time i customize the any Rig with the Extras provided.


Apparently it is not so straight forward. But after doing it once it is quite easy.


1. Get the latest version of Aia and Extras from AMP. Open the Aia file.


2. Right click Extras file and click "Import into maya"


3. The Extras control will appear to the left side of the feet.


4. Select the Root Control
5. Change "Body Selectable" to "on".


6. Select the Clothes, shoes or Hair to change. And press delete!


7. Select through each Extras control Letter and click the preferred "show".

H-Hair  T-Top  B-Bottom  S-Shoes  A-Accessories


8. Select the Top.
    * See updates on "Wrapping clothes to Skin" at the bottom of the post before doing this step.
9. Shift select the body.
    (For Rigs that cannot select the body by clicking like Bishop, go to outliner and ctrl select the body       geometry.)
10. Click Wrap. Repeat for Bottom, Shoes and Accessories. For the Hair go to the next step
      * See updates on "Wrap" at the bottom of the post before doing this step.


11. Select Head Curve.
12. Shift select Hair Curve or Hair geometry.
13. Click Parent constrain.
      (Basically anything i want it to deform when the geometry is bent or stretched i wrap, anything i only want it to move together but not deform i constrain. Example: For Bishop, top, bottom, shoes, eye brows - Wrap. Hair, ears - Constrain. Accessaries - Depends how i want it to be.)


14. For clean-up and also to reduce the Rig file size, delete everything that is not needed. Including the Extras Control and all the Extras that are hidden.


15. Lastly save into the Shots directory in AMP. Reference into Maya when needed for the shot.


*Last note if the Customised Rig becomes very lag when moving the body around, go back to the original Rig file and set the geometry to Low quality display. Select the geometry and press 1 - Low quality display, 2 - Medium quality display, 3 - High quality display.


Updates (28/1/2016)

Wrapping clothes to "Skin"

A new trick found by Justin Owens from Animation Mentor. If the clothes is wrapped to the body geometry when it is at Low Resoution, when switching to High Resolution the clothes will not work. That is because when selecting the body geometry during the wrap, the current visible body geometry selected is under "aia_anim_geo_grp". In order for the clothes to work in both High and Low Resolution, the clothes have to be wrapped to the body geometry under "aia_skin_geo_grp" which is hidden. Follow steps below.
*If this is too complicated to do and there is no need to switch between High and Low Resolution then skip this method.

1. Open outliner
2. Select clothes
3. Find "aia_skin_body_geo" and ctrl select it
4. Click option for "Wrap"
5. Click "Create". (Make sure "Exclusive bind" ticked)


Wrap

1. Click "Wrap"
2. Make sure "Exclusive bind" is turned on.
3. Click "Create"


Tuesday, 13 January 2015

Lesson learnt 001 - Rendering in Maya

I am going to start documenting any animation lessons learnt from the art courses i have attended. It is of no chronological order. Any time i remembered something i will record down for easy reference in the future

1st up is a lesson learnt from class AN01 of Animation Mentor. Rendering in Maya.

Of course there are tons of way to render an object. But this is an easy way that i use for rendering a character pose. The rendered image will read better with its tones and outlines clearly seen. The shadow can also tell a story with its own silhouette when the light is positioned right.


Setup

1. Click Window/Rendering Editors/
2. Click Render Settings or click the shortcut button.


Create Light

1. Click Indirect Lighting
2. Click Create Physical Light and Sky
3. A light source is created. Rotate it to change the light angle. It is not necessary to translate it, as it is a directional light and the angle is fixed regardless of where it is located. Also play with the intensity and color.
4. Make sure this is enabled to be able to select the light source
5. Press "7" to be able to see the effect of the light in real time before rendering.


6. Make sure you show Camera and Light


Render

1. Click AM menu button or maya shortcut button. A rendered image will appear.
2. Go to outliner and click "shot_cam".
3. In Attribute Editor click "mia_physicalsky1"
4. Play around with the back ground. This adjusts the horizon line up and down.
5. This adjusts the amount of blur effect on horizon line.
6. This adjusts the color of the ground.
7. For easy compare of images after adjustments, click this to keep this image to compare it later using the slider below.
8. Make sure this is at mental ray.
9. Save image to any format.


Last Note

1. If the head is too bright. Click Hypershade.
2. Find the color close to the head color.
3. Click the color box.
4. Make sure this is at "1".